
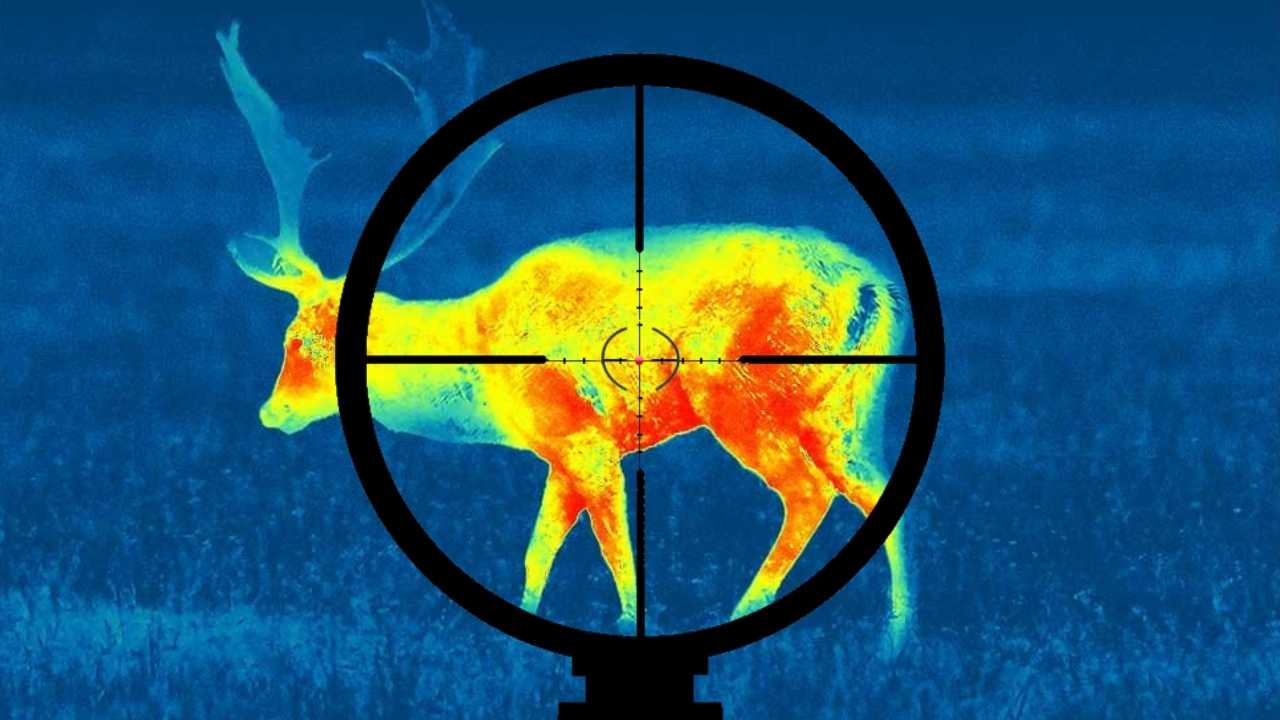
An investment in a thermal scope is one you will not regret. It is difficult for any living creature to hide from a thermal scope. Their application includes military as well as civilian purposes. It has also revolutionized nighttime hunting and is giving a tough competition to all night vision optics. Thermal scopes make it easy to locate and hit the target.
They are digital scopes that work on the principle of infrared rays. It detects the heat that the object in view emits. It detects that heat energy and makes the vision of the thing clear. This view is something that a naked eye cannot see.
What does it mean by sighting in a scope?
The sighting process involves aligning the barrel of the gun to the scope that sits on it. It is necessary to align your scope with your rifle for better target acquisition and hit.
Why do you need to sight in your scope?
Sighting in the scope with the gun is essential because an unaligned scope can miss the mark or even lead to unethical killing. It doesn’t matter which scope you are using or how efficient it is; the ability to hit the target will depend mainly on how properly you sight it. A thermal optic is no different.
How is sighting thermal scopes different from traditional scopes?
Sighting in a thermal scope is different from sighting in other traditional scopes. One primary reason is that thermal scopes are digital; they have no turrets for elevation and windage settings. They use buttons for the adjustment of the reticle during the sighting process.
The other significant difference is that for sighting in a thermal scope, you need a target that has a temperature different from its surroundings: cooler or warmer.
How to sight in a thermal scope
Begin with the manual
For thermal scopes, different companies have different settings for making adjustments to the reticle. For this purpose, the process of sighting in should start with understanding the scope. To understand the scope, you can read the manual that comes with it. By reading the manual, you will be better able to know how you can control your reticle. If you don’t understand how the button works, it will get you stuck in the field. So, the first step while sighting in a thermal scope is easy: read the manual.
The required setup
If you have been dealing with regular scopes, you know that you don’t require much to sight it in. You need to place a paper at a specific distance from your shooting position and shoot it. But sighting in a thermal scope needs a little bit of investment.
Thermal scopes work on the principle of infrared radiation. They identify an object by the heat energy it emits. For this purpose, you need a heating or a cooling pad for sighting in a thermal scope. This pad will be attached to the target distance, and then only the thermal scope will be able to capture its energy and identify the target object, which will help get a clear image.
The most preferred accessory you can use for this purpose is a Thermal target. A thermal target is the best way to sight in a thermal scope. Some trusted brands such as Atn and Thermbright manufacture thermal targets. Setting a thermal target does not require much effort; you need to attach it to the wall.
But what if you cannot afford to buy a thermal target? Well, there is a solution to that problem as well. One can use hot or cold water bottles, reflecting tapes, or hand warmers as an alternative to thermal targets. You can create a cross target with the help of these accessories. And then use the cross target as the center point.
Distance is important
After having the required target, the second important thing is to have the appropriate distance for shooting. You can not sight in your scope at a specific distance and then use it for different lengths in the field. If you want to shoot up to 100 yards with your scope, you will need to sight it in up to 100 yards.
The ideal distance for zeroing your rifle scope ranges between 50 to 200 yards, But if you shoot at different ranges, you need to zero at various ranges. It is also preferred to start sighting in from a shorter distance and then move to a more significant one.
Keep in mind the bullet drop
The other major factor to keep in mind here is the bullet drop. Bullet drop is when the bullet falls before reaching the target due to the effect of gravity. To compensate for bullet drop of the scope, you need to use the same ammunition for target shooting and hunting. Using the same ammo is essential because the bullet weight velocity and the gun’s caliber affect the bullet drop compensation.
So, when you sight in with one ammunition and adjust according to its bullet drop rate, you have to use the same ammunition while hitting your target in the field. Because if you use different ammunition, the difference in the bullet drop can affect target hitting.
Stabilizing the rifle
After setting up the target accurately, the next important step is to stabilize your rifle. It is crucial to have a strong base for your rifle to hit the target correctly. The process of zeroing your scope and rifle involves hitting the target at the bull’s eye. Striking the right spot is not possible without providing your rifle with stable support. Also, when you sight in, you measure the distance between the center and the point that you hit. All this is impossible without stabilizing your rifle.
The ideal way to stabilize your rifle is to use a tripod or a bipod. But if these are not available, you can use heavy bags for giving support to your gun.
You can spend the whole day trying to zero your scope with your weapon and take numerous shots, but without stable backing, all of it will be in vain.
Taking practice shots
After you are all settled with your target, have a stable base, load your ammunition, and sit at your position. Take three shots of the target that you have set at your required distance. Usually, three shots are enough for this purpose, but new shooters can also take five if required. With these three shots, aim to hit the center. These three shots will not necessarily hit the center but will give the shooter an average strike rate.
After hitting the three shots, go to your target and see where you have hit them. As you have tried to hit the center of your target, you will have three shots clustered together. Measure how far from the center you have hit your shot. You have to measure this distance both horizontally and vertically. You can also write the measured distance for remembering it correctly. These measurements will give you information about what adjustments you have to make for hitting the center.
Make adjustments
The first three shots will determine how far you have hit your desired aim, i.e., the center. After measuring that distance, you need to make adjustments in your scope.
Like most modern-day scopes, thermal scopes are digital; they have buttons for adjustments rather than turrets, and most of them have the main menu system for reticle adjustment. However, different thermal scope brands have different adjustment settings. For accurately adjusting your thermal scope, you need to refer to the manual of every specific brand. Then according to the information in the manual, make the adjustments in the reticle.
Keep on taking shots.
After adjusting your settings according to the measurement of the three shots, you need to keep on taking shots till the center is not hit. What is important here is that you keep the position of your rifle, your distance, and your firing pattern consistent. You can stop when you hit the center. Because when you hit the center, you have completed the sighting process.
The advanced one-shot zero
Many people feel like they are wasting their ammunition in the process of sighting in their scope. Some companies are making advanced one-shot zero scopes. One-shot zero means that you can zero your scope with one shot instead of taking three shots. Many advanced thermal scopes allow the shooters to zero their scopes at one shot.
You take a shot directly at the center. After that, you can freeze the reticle and move your crosshairs at the point of your shot. Then, you can save this setting. When you take the shot after this process, you directly hit the center. In this way, you can save your ammunition.
Final thoughts
Thermal scopes are advanced scopes. They work with thermal energy and have increased the efficiency of hunters to shoot their targets.
They work best during nighttime and also allow a clear vision during dense fog. However, sighting it in is essential if you want to use a thermal scope at its full potential.
Sighting in a thermal scope requires more effort than the traditional scopes. Without sighting in the scope correctly, it becomes almost useless to target your aim. Hence, for proper use, it is vital to sight in the scope properly.
FAQS
What is the difference between a thermal scope and a night vision?
A night vision device, just like a camera, needs light to create an image. Thermal scopes, on the other hand, make images from heat.
What is the battery life of a thermal scope?
Thermal scopes have a battery life of 8 hours which is good enough for a night hunt.
Is it legal to use a thermal scope in the US?
Yes, it is legal to hunt with a thermal scope in the US.
Does a thermal scope work during the daytime?
Thermal scopes are famous as night scopes due to their efficiency in working in darkness. But they equally work well in the daytime as well.